Transforming Plain White Seamless Paper into Colorful and Fun Backgrounds
A photography studio should be perceived as a playground for boundless creativity. Nearly every photographer possesses a roll of white seamless paper; surprisingly, it might be the most versatile tool you need to craft a wide variety of images.
White seamless can be easily transformed by just manipulating light. For instance, it will appear gray when no direct light is applied or white when properly lit. Alternatively, you can turn it into any color by using color gels or RGB lights and even create color gradients by combining different color lights. The options are endless!
In this article, I’ll walk you through some of my favorite ways to use seamless paper in the studio.
White Minimalistic Setup
During photo shoots, it is always a good practice to start simple. That applies to wardrobe, hair makeup, lighting, and studio setup. You can then build up by adding creative lighting, props, wardrobe styling and makeup.
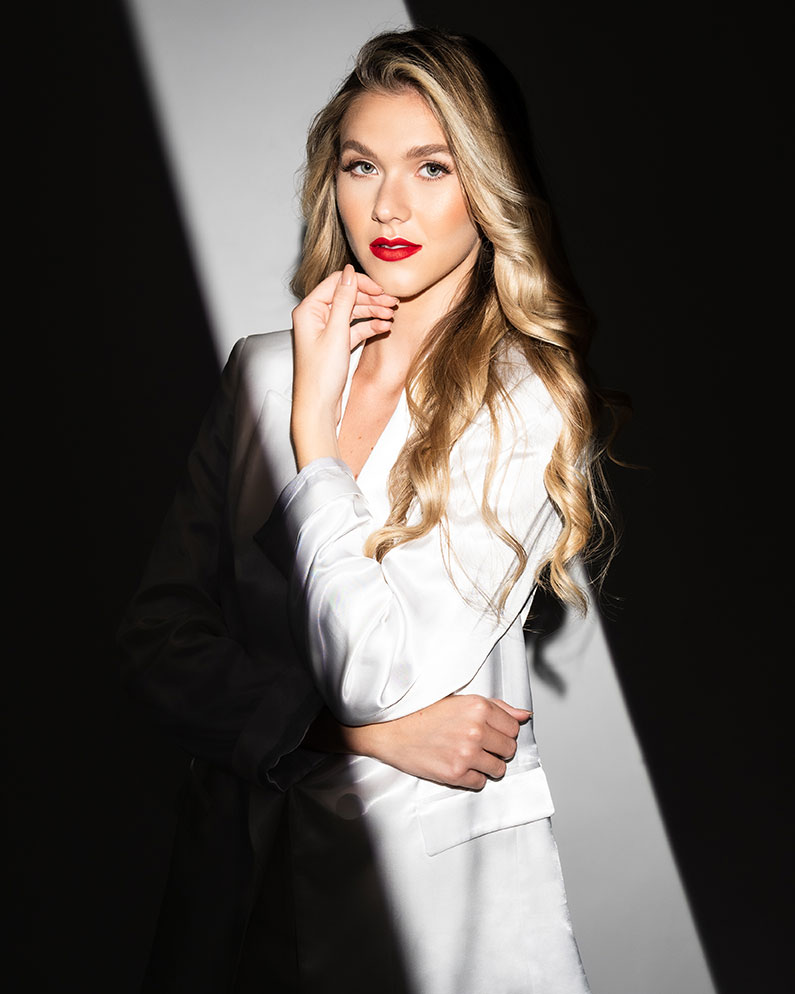
This first picture was crafted around the concept of white minimalism. The model wore a simple white dress, and we opted for subtle makeup to embody the essence of this clean white aesthetic.
The lighting setup played a pivotal role in bringing this vision to life. To achieve this white minimalistic image, two strobes with strip light modifiers were strategically positioned on each side of the model, aimed directly at the white seamless. The effect was an exquisite play of light as it bounced off the backdrop, casting beautiful rim lights contouring the model's figure.
To soften the shadows an additional strobe paired with a small octagon soft box was placed above the camera, directed to fill in the shadows on the model's face and dress, creating a timeless, elegant image.

Nikon Z 8, NIKKOR Z 24-70mm f/4 S, 1/160 second, f/7.1.
Dramatic Light
Significant changes can be made by manipulating light. This next picture was also taken against white seamless paper. The model also wore a white outfit, but this time, the light was more dramatic, lending an air of mystery to the subject and resulting in a different look. To create this light effect, I used an optical spot attached to a strobe. An optical spot is a tool designed to manipulate light by narrowing its spread and concentrating it into a defined spot. They’re commonly used in studio settings or controlled environments to emphasize or highlight a particular element within a photograph. They offer control over the illuminated area's size, intensity, and shape, giving photographers creative freedom in shaping their images' overall look and feel.
Optical spots can be used to create various lighting effects, such as spotlighting a single subject against a dark background, adding highlights to specific features, or creating mood-enhancing effects by controlling the direction and intensity of light. For this picture, I manipulated the blades on the optical spot to create a diagonal light stripe, making the model look like she was emerging from the shadows.
Nikon Z 8, NIKKOR Z 24-70mm f/4 S, 1/125 second, f/5.6
Incorporating Props
Introducing props into a photoshoot can significantly enhance storytelling and aid in guiding and posing subjects. Among the props available, disco balls are iconic and a fabulous addition. When combined with the proper lighting—particularly harsh light—they create a mesmerizing symphony of reflections that adorn the entire set with a magical sparkle.
For this image, the model wore a white outfit and was photographed against white seamless paper. I also used one light with an optical spot; however, for this image, the blades of the optical spot were adjusted to form a circular frame around the subject.
For optimal reflections while photographing disco balls, ensure that you direct harsh light directly onto the disco balls, allowing the reflections to spread uniformly across the surroundings.
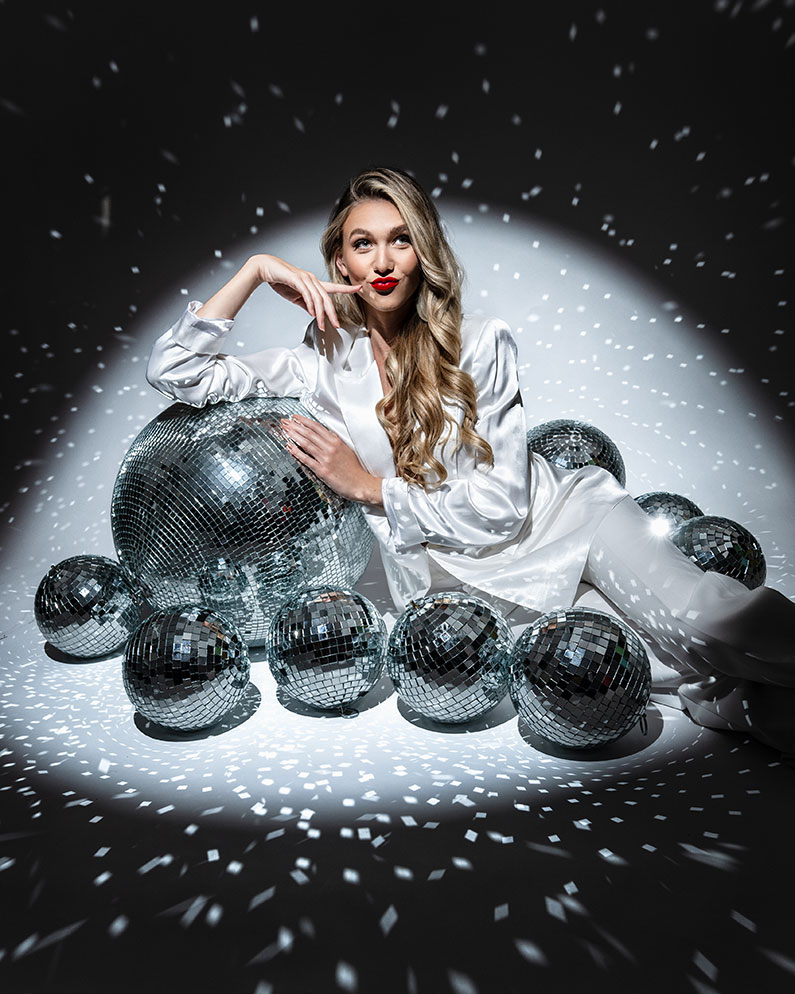
Nikon Z 8, NIKKOR Z 24-70mm f/4 S, 1/125 second, f/5.6
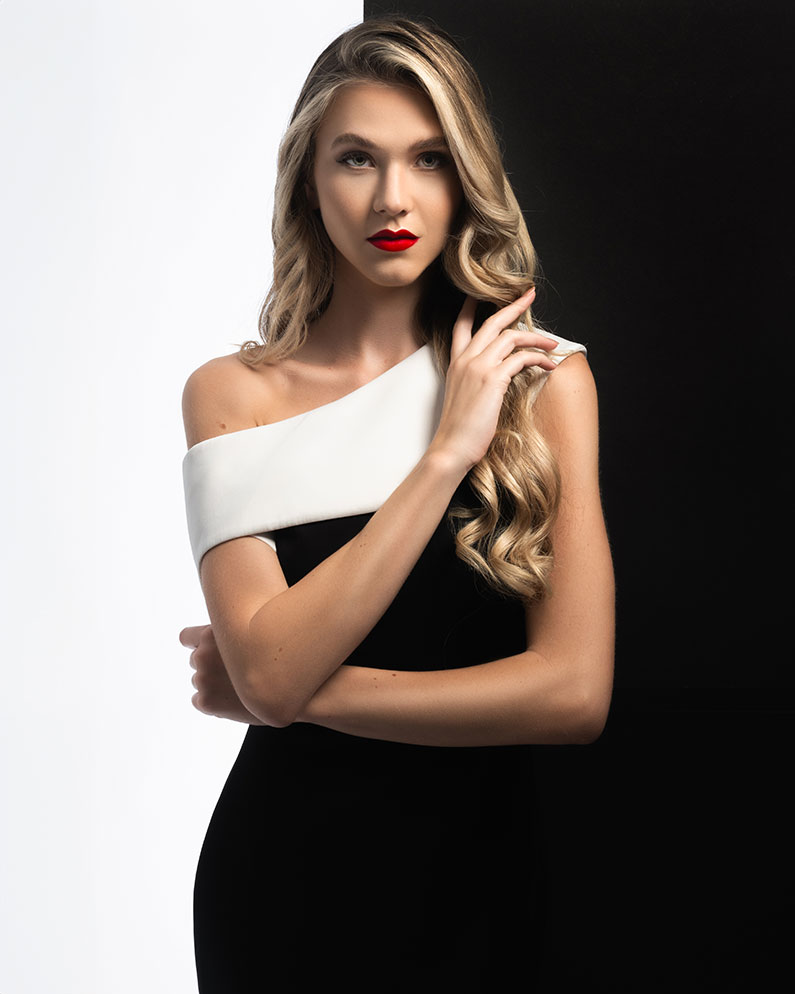
Black and White Setup
Another fabulous technique I often utilize in the studio is layering seamless paper. This minimalistic yet sophisticated black-and-white setup transcends time and suits various photographic genres. Its versatility makes it a go-to-choice for different types of photography sessions, including headshots, personal branding, fashion and maternity.
To take this technique to the next level, you can create a yin-yang effect—a visually compelling interplay between light and shadow, by strategically lighting the subject from the black side of the background and allowing shadows to fall on the white side, enhancing the depth and dimensionality of the images and adding a touch of drama and artistry to the photographs.
Z 7, NIKKOR Z 24-70mm f/4 S, 1/160 second, f/14
Nikon Z 8, NIKKOR Z 24-70mm f/4 S, 1/125 second, f/13.
Polka Dots
Utilizing dot stickers offers a simple, cost-effective, and enjoyable method to infuse unique charm into your sessions. This fun technique introduces an element of playfulness, elevating the visual narrative of the photo shoot.
My studio is always stocked with various colors and sizes of dot stickers, allowing me to coordinate them with my clients' outfits and the backdrop colors.
The dot stickers help to enhance the overall narrative and add depth to the photograph.
This playful technique is a beloved part of my photography style, infusing each image with whimsy and character.
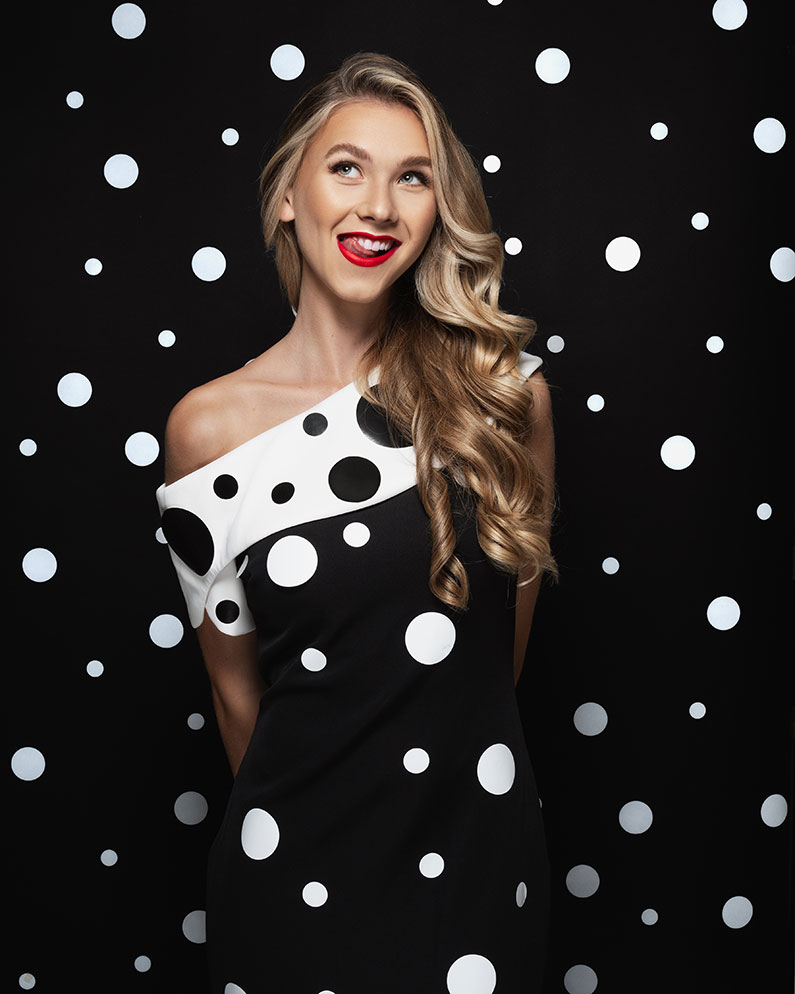
Nikon Z 8, NIKKOR Z 24-70mm f/4 S, 1/125 second, f/13.
Ripped Background
I love embracing controlled chaos by playfully and artistically stepping toward controlled destruction, opening a small hole in a seamless backdrop, and tearing the edges. This technique can be incredibly versatile and can be used to create portraits, headshots, product photography, personal branding imagery, family and group shots, and more! The key here is to let your imagination run wild.
You can also experiment by playing with the background colors. I opted for a black backdrop in this picture to create a bold contrast, but you can also consider using gels or RGB lights to add colors to the background.
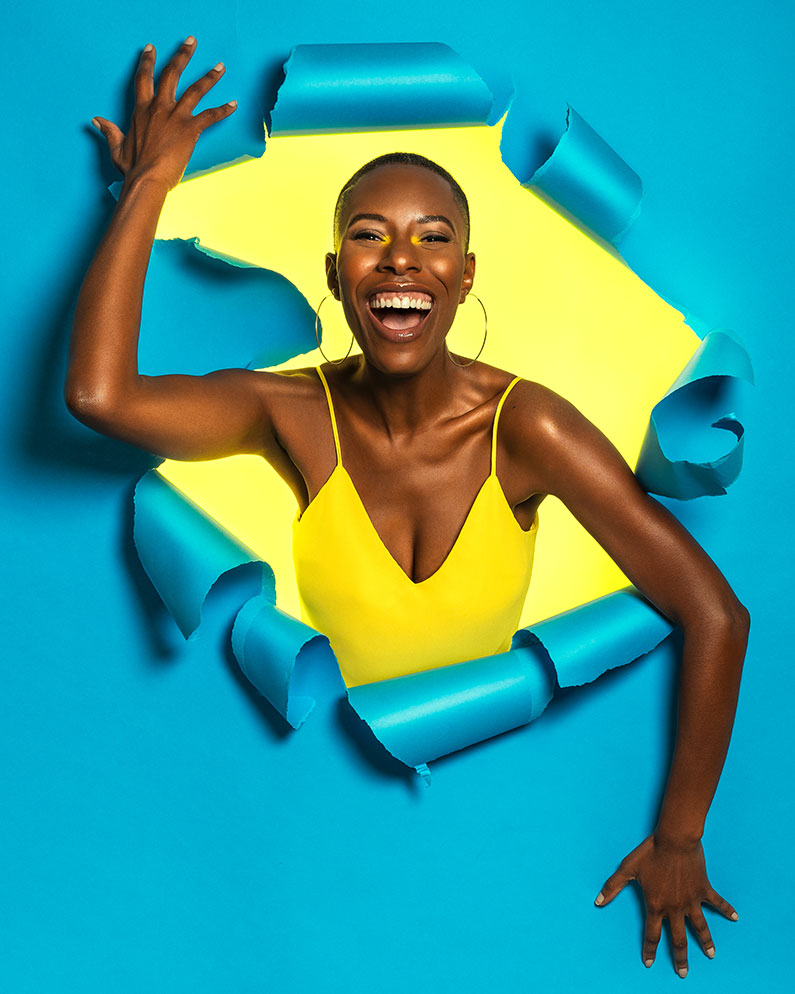
Z 8, NIKKOR Z 24-70mm f/4 S, 1/200 second, f/7.1
Colored Shadows
RGB lighting has become my favorite lighting technique, and I use it whenever I want to look smart and impress my clients. This technique combines red, green, and blue lights, producing white light while casting mesmerizing colored shadows. To create this setup, you must evenly position three separate light sources emitting red, green, and blue colors around the subject. These can be RGB lights or individual lights with color gels. You have to adjust the intensity of each light source to ensure an equal balance of red, green, and blue light. Combining these primary colors creates the perception of white light to illuminate the subject. The red light source will cast a cyan shadow, which is red's complimentary color; the green light will cast a magenta shadow, which is green's complimentary color; and the blue light will cast a yellow shadow, which is blue’s complimentary color.
You can adjust the distance and angles to the light to create different shadow effects. Also, you can position the subject closer or further away from the background to obtain different results.
In this image, I positioned the lights below the subject, making the colored shadows appear bigger than the subject.
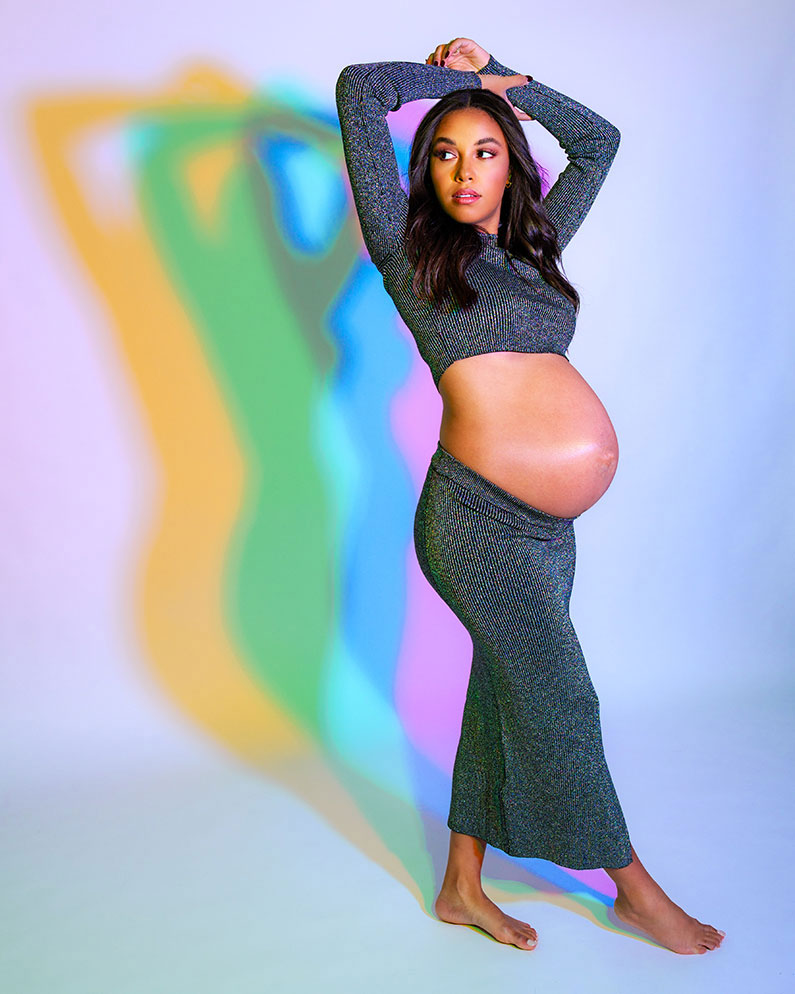
Z 8, NIKKOR Z 24-70mm f/4 S, 1/100 second, f/7.1
Colored Background
White seamless papers are the ultimate photography chameleon and can be transformed into any color using color gels or RGB lights. If you haven't experimented with this technique before, here are a few things to consider, to achieve the desired color effect on the background. Camera settings are vital to ensure the background colors appear as expected. It is always a good practice to first light the background and gradually add other lights to ensure the correct exposure, saturation, and vibrancy and avoid light spilling over into an area you don’t want to be lit. Another thing to keep in mind is the intensity of the light. For instance, if the lights are too powerful, the colors will look washed out, or if they are not powerful enough, they’ll look muted. The distance between the light and the background can also influence the intensity and spread of color, and the angle between the light and the background can produce different gradients and patterns. You can also consider using light modifiers to control the spread of light and create other effects.
For this image, I paired an LED light set to blue with a lantern modifier to create an overall blue atmosphere in the studio. LED lights can be modified to different colors, without the need for added gels. Then, I incorporated two tube LED lights, one placed above the model and another below her, to illuminate her face evenly. The tube lights created a white stripe effect in the background, matching the angle of the model's arms beautifully.
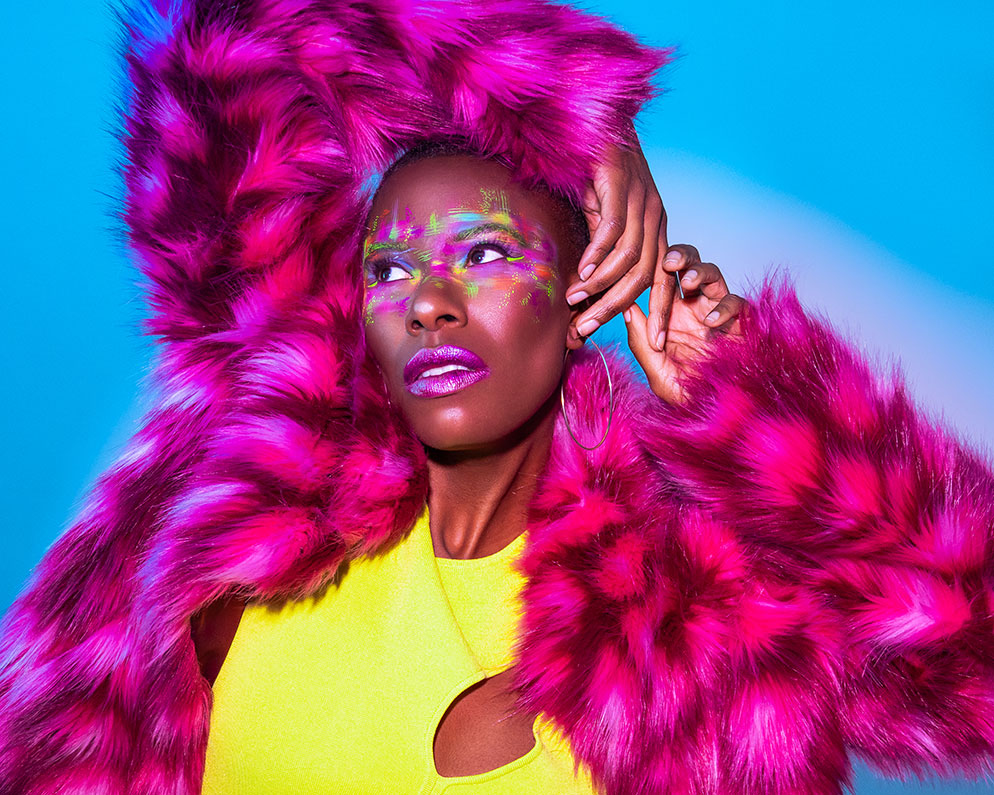
Nikon Z 8, NIKKOR Z 24-70mm f/4 S, 1/125 second, f/4.
Experimenting with your photography isn't just about technique; it's a journey of pushing boundaries, allowing spontaneity, and discovering beauty in the unexpected, this time with a simple seamless paper to create different visual narratives.