Shooting Wirelessly with the Nikon WR-R10 and WR-T10 Wireless Remotes
Shooting wirelessly with Nikon's wireless remote controller system. - This video explains how easy it is to use the Nikon wireless remote controller system's WR-R10 and WR-T10 to take great photos.
The Nikon wireless remote controller system, which includes the WR-R10 transceiver and the WR-T10 transmitter, allows you to easily compose a photograph and then get into the shot, taking the photo whenever you want. You can also start and stop video as well. And you can also pair multiple cameras in different locations for multiple angles of the same scene.
The WR-R10 transceiver connects easily to your Nikon DSLR. If your camera uses an accessory terminal, all you have to do is simply plug in the unit. If your camera has a 10 pin connector (these are found on the higher end pro DSLR bodies) then you will need to use the WR-A10 adapter to connect the WR-R10 to the camera. [Check your camera’s manual for compatibility.]
The system uses radio frequencies to communicate with one another.
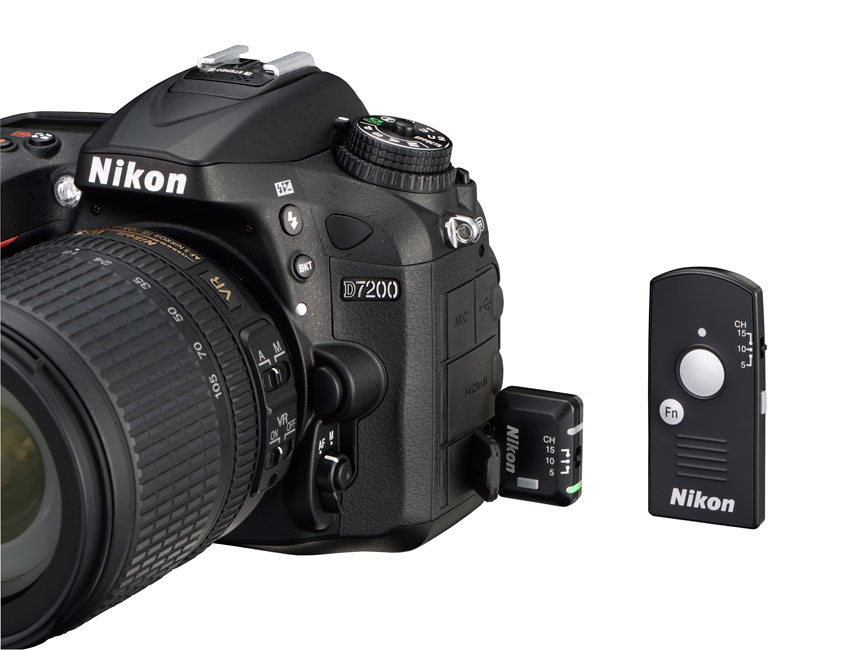
The Nikon D7200 (shown here) has an accessory terminal connection. It accepts the WR-R10. For cameras that feature a 10-pin connection, attach the WR-A10 adapter to the WR-R10 to connect to the camera.
Setting up and Pairing of a WR-R10 and WR-T10
Set-up is simple.
1. Connect the WR-R10 to your camera, either via the accessory terminal on the camera or with the WR-A10 adapter attached if your camera requires it.
It’s easy to set up and sync the remotes with your camera.
2. Set the channel you want to use—you can choose from three channels: 5, 10 or 15.
3. Pair the two devices. Then turn on the camera, place the two devices next to each other and press the grey pairing buttons simultaneously until the red and green LEDs on the receiver flash on and off in sequence.
The cameras are now connected up to a distance of about 66 feet within the line of sight. You’re now ready to shoot. The button on the Controller acts just like the shutter release button on your Nikon camera. Press it halfway for auto-focus and all the way to take the picture.
One of the WR-T10 Transmitters can be paired with an unlimited number of cameras with WR-R10 receiver units attached.
Pairing multiple cameras to one master camera
Cameras that have a 10-pin connector can be set up to be a "master" camera so when you press the shutter button on that camera body, the remote cameras you’ve paired to it will all fire simultaneously. Only the master camera needs to be a model that utilizes the 10 pin connector. The remote cameras can be models where the WR-R10 attaches using the accessory terminal. With this set-up, the shutters on all of the cameras within a line of sight of 164 feet will now be released when the shutter-release button on the master camera is pressed all the way down.
1. Attach the WR-R10 with the WR-A10 adapter to the 10 pin connector of the camera that you want to set as the master.
2. Set all of the cameras—the master camera and the remote cameras—to the same channel (choose from channels 5, 10 or 15)
3. Turn on the cameras and press the pairing buttons on the master camera and one of the remote cameras simultaneously, until the red and green LEDs flash in sequence.
4. Repeat this until the master camera is paired with all the remote cameras.


