Photographing Still Life Subjects using Flash
Utilizing Speedlights and the Auto FP High Speed Sync function
You’re probably thinking to yourself, “What is Auto FP High Speed Sync and what can it do for me?”
It can help you make a pretty cool still life image
Auto FP High Speed Sync is a setting on select Nikon digital cameras that gives you the ability to usa much faster shutter speeds with flash than normal. Check the user manuals for your camera and Speedlight flash to see if your camera and Speedlight combination have this option available.
The maximum normal sync speed of a camera is the fastest shutter speed that you can use with a Speedlight. Here’s an explanation as to how the shutter works when you’re using a flash. When you press the shutter button, the first shutter curtain will fully open and expose the sensor/film before the second shutter curtain starts to close. When using shutter speeds faster than maximum normal flash sync, the second shutter curtain starts to close before the first shutter curtain is fully open. With ambient light the sensor/film is exposed by a moving slit or gap between the two moving shutter curtains.
Z 50, NIKKOR Z DX 50-250mm f/4.5-6.3 VR at 160mm focal length, 1/800 second, f/9, ISO 100, manual exposure, Matrix metering
What does all this technical information mean?
With flash, under the default settings, using a shutter speed faster than the flash sync speed would cause a dark band across one edge (usually the bottom) of your image. This is caused because the flash fires but the rear shutter has already started to close, blocking part of the sensor/film. So the dark strip is an underexposed area that wasn’t exposed to the light from the flash.
With most modern cameras, it is next to impossible to get a camera to fire "out of sync" like that if you’re using dedicated hot-shoe mounted flashes.
The FP feature basically switches the flash from a "one big pop" output to an output that has multiple repeating and overlapping pulses that "paint" light over the sensor/film via the moving shutter slit that cameras use when faster shutter speeds are selected. The upside of Auto FP High Speed Sync is that it allows shutter speeds up to 1/8000 of a second to be used with a flash. The downside is that the pulses can't be as powerful as a single "pop" and will reduce your working distance.
Putting theory into practice
One way to mentally approach your next flash image is to think of a flash image as basically a two part multiple exposure. One exposure for flash and another exposure for ambient light. Because the flashes turn on and off much faster than maximum normal flash sync speeds on cameras (sometimes as fast as 1/40,000 of a second on the SB-700) shutter speeds have no effect on the flash exposure. When you’re using a flash, the exposure is controlled by the output from the flash and the camera's aperture.
Since the aperture is now pre-set for the flash exposure, the ambient light is controlled by the camera's shutter speeds. Many times photographers strive for a balance between the ambient and flash exposures (balanced fill-flash). That is we try to get the flash and ambient light to be as close to the same exposure as we can to minimize the "Wow, you used a flash" look.
Use Auto FP High Speed Sync unconventionally
One of the interesting ways you can use the FP Sync and faster shutter speeds is to eliminate the ambient light. Not balance with it, but to so unbalance it that it completely eliminates any light that isn’t coming from the Speedlight. With FP Sync active, switch to manual exposure mode and increase your shutter speed to the point to where the ambient light exposure is underexposed to the point of being detail free black.
The really cool part of this is that it really doesn't matter how bright your ambient light is as long as you can get a shutter speed/aperture combination that will render a non-flash image more than about 3- stops underexposed, then add an FP synced Speedlight and you can get a deep black, detail free background with a well-lit subject.
The higher the shutter speed you use, the harder the Speedlight must work which reduces effective Speedlight-to-subject working distance. So find the point at which the background goes black, but don’t go much beyond that.
Activating FP Sync
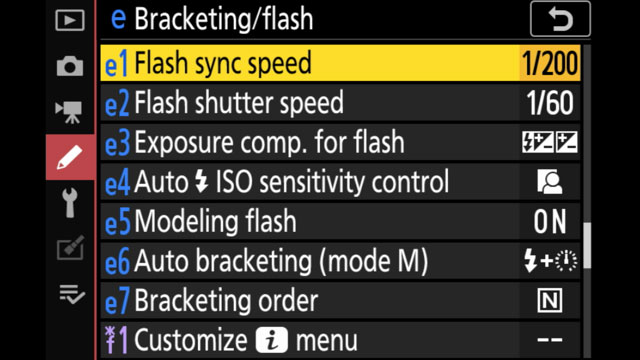
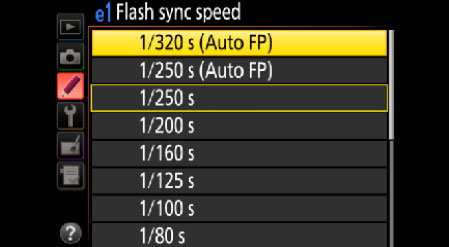
On most recent, compatible Nikon cameras (check your user’s manual) you can activate the FP Sync feature by navigating to the CUSTOM SETTINGS Menu > E1. Choose the option with (Auto FP) next to it. Most Nikon cameras only have a single (Auto FP) option listed however, if there’s more than one, I recommend using the fastest shutter speed listed with (Auto FP) next to it. Once this is activated, shutter speeds faster than the normal flash sync speed will be available when using your Nikon Speedlight. (Note: non-Nikon flashes may or may not work fully with this feature.)
Z 50 NIKKOR Z DX 16-50mm f/3.5-6.3 VR at 50mm focal length, 1/800 of.a second, f/6.3, ISO 100, manual exposure, Matrix metering.
Z 50, 16-50mm f/3.5-6.3 VR at 50mm focal length, 1/800 of a second, f/6.3, ISO 100, manual exposure, Matrix metering
This brings me back to my subject of choice: tulips. I grabbed a vase, a scrap of material and the tulips before heading to my makeshift studio: the dining room table. I mounted a NIKKOR Z DX 50-250mm f/ 4.5-6.3 VR lens on the Z 50 and placed an SB-500 Speedlight on the hot-shoe. The SB-500 activates the Z 50’s built-in Commander Menu. The Commander Menu allows me to control off-camera Nikon Speedlights. in this case, an SB-5000, from the back of the camera. I never have to go to the SB-5000 to make exposure settings.
Because I wanted to use an unbalanced flash. I wanted the background to fade into black but I really didn’t think that a bright cheery exposure would help convey the feeling I wanted.
The off-camera SB-5000 Speedlight was placed in a small soft box to soften the light.
Tulips placed on a burlap fabric background and the camera set to the Sepia Creative Picture Control which gives the image a desaturated look and feel. Z 50, 16-50mm f/3.5-6.3 VR at 33mm focal length, 1/640 of a second, f/7.1, ISO 100, manual exposure, Matrix metering
I set the Z 50 to manual exposure mode, ISO 100, f/9 (to keep most of the tulip bulb in relative focus) and experimented until I found that 1/800 of a second gave me a good, rich, detail free black exposure without the flash exposure.
Through trial and error, I found that by placing the soft box with the Speedlight on the side and slightly in front of the tulips I got the look I’d envisioned. But the image wasn’t quite right. It was too bright and cheery. So I set the Z 50’s Picture Control to Sepia. This gives the image the slightly desaturated and ‘bronzed’ look I had in my head.
IMPORTANT to note: FP sync can NOT be done when the built-in flash is being used for the exposure (TTL or M). It can be used if the built- in flash is being used as a Creative Lighting System (CLS) trigger, but in the Commander Menu the built-in must be set to "- -" for FP sync to work.
So look around your home for an object to photograph, find a background and try this yourself!

