Lighting with Two Speedlights
Behind the Scenes at Portrait Lighting Workshops With Speedlight Flash Master David X. Tejada
It's no secret: photography is all about light.
The word itself originates from the Greek for drawing (or writing) with light. Light is arguably the most important element in photography, and we all wish for that element to be at its best when we need it—which is all the time.
The best light you can have is light you can direct, modify and modulate. In other words, light you can control—and that means flash. Ambient light can be beautiful, but it's not reliable. It may not be where you need it to be, and if it is, it's not for long. Flash, on the other hand, is dependable, consistent and controllable. For portraits formal or casual, it's your best bet and best friend, and once you become familiar with the basics, it's likely you'll quickly come to rely on its power, consistency and versatility.
To illustrate our point, we teamed up with corporate photographer David X. Tejada, whose job, essentially, is to walk into diverse and challenging locations, from construction sites to corporate offices, research labs to cubicle mazes, and make flattering, storytelling photographs. David is the problem solver on the scene, the photographer who can call on 30-plus years of experience—and adapt, innovate and improvise if that's not enough.
He does it all with the Speedlights of the Nikon Creative Lighting System (CLS).
David is also a renowned workshop instructor who uses his Speedlights in a series of on-location workshops titled Small Strobes, Big Results. In addition, he teaches on behalf of NPS (Nikon Professional Services) and in connection with worldwide photography institutions.
What we have for you here is the opportunity to drop in on David as he takes his students through workshop sessions designed to put them in control of light. In the following series of 12 images, he'll be using some of his favorite techniques, explaining the hows and whys of his methods and demonstrating single-flash creativity as well as the possibilities of multi-flash setups.
Bright ideas await.
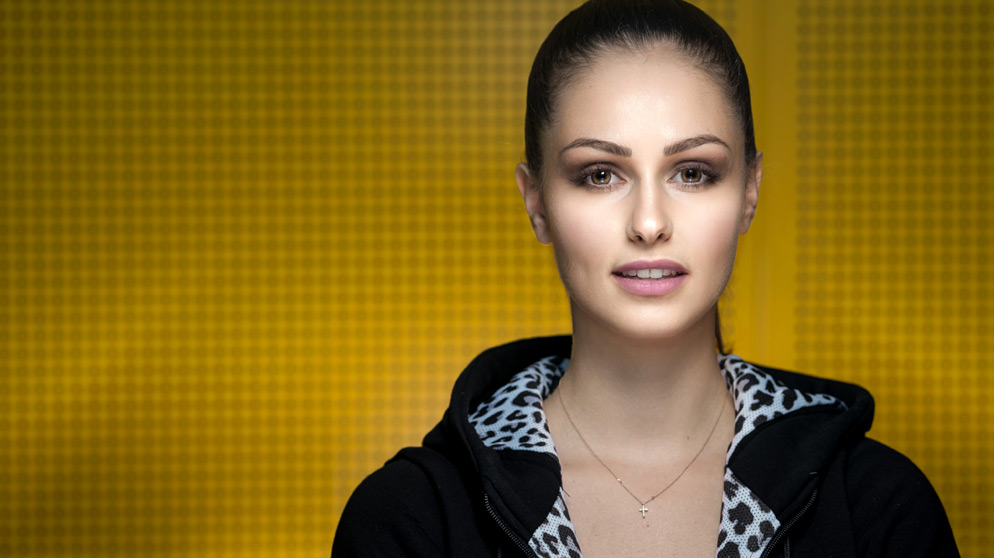
D850, AF-S NIKKOR 70-200mm f/2.8G ED VR II, 1/125 second, f/4, ISO 200, manual exposure.
Small Space, Quick Results
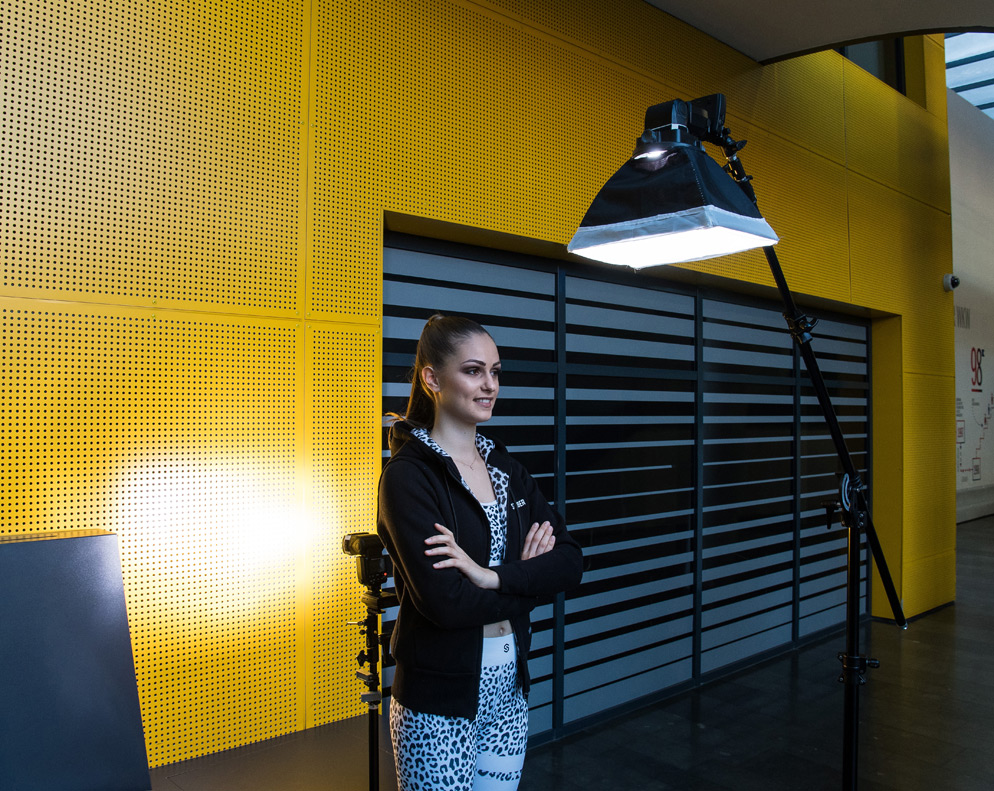
For one of his workshops, David rents space in an educational tech center. "We have a classroom session," he says, "then we walk around and find places to photograph."A small seat-and-bench area in front of a bright yellow pegboard seemed a perfect place to demonstrate how two lights can be used quickly and effectively—"without getting in the way of folks."
An SB-5000 lit up the background behind his model, and an SB-900 in an 8x12 softbox served as the main light. (In keeping with his "keep it light and compact" attitude toward gear, David owns a European softbox that came in a kit with light modifiers, including grids, snoots and barn doors. There are number of these kits on the market in the U.S.)
"You can see how far in front of her the softbox is," David says. "It's not over her, not pointed at her." Rather, its light is directed at her by a 30-inch Lastolite TriGrip reflector with a Softsilver surface, held flat in front of her.
A Note on Metering
Okay, it's a rather long note, but it's important.
David doesn't meter. He sets his cameras for manual mode and chooses his f/stop for the depth of field he wants for the photo. He set his shutter speed based on a number of factors—for example, If the photo will include some ambient light, he'll need a speed slow enough to capture it. If he's hand-holding, he'll need a faster shutter speed. Likewise, he'll set the ISO to accommodate the situation.
Then, with those settings made and effectively locked in, he controls the exposure by first setting his Speedlights for full manual mode and then adjusting their power output: full power, 1/2, 1/4, 1/8... whatever works. And he knows what will work because thanks to his years of experience he can pretty quickly size up a location and accurately set his Speedlights' power for the results he wants. If he's off a bit, a test shot will reveal it, and he'll make a power adjustment.
But David's workshop students don't have his experience, though they'll probably leave the workshop a lot closer to power adjustment skill than when they arrived. So If you're a beginner or intermediate flash shooter, David suggests you initially rely on the Creative Lighting System's automatic operation.
First, set your Nikon DSLR for aperture-priority exposure because selecting an f/stop is the crucial creative decision that will determine a lot about the look of your photograph. You might choose wide open (f/2.8, for example) for a bokeh effect or to blur a distracting background, or closed down (f/8 or f/16) for greater depth of field.
Then for any photo that's going to include a constant ambient-light source in addition to flash, take a Matrix-metered test shot of your subject in that light with the camera set for zero exposure compensation. If the test looks good, you're ready to turn on and set your Speedlight(s). If you need to adjust the ambient-light exposure, use the camera's exposure compensation function to increase or decrease the amount of ambient light captured in the image.
Once you're satisfied with the ambient light exposure, turn on your Speedlight(s). Set the main light (it'll be the only light for a single-flash setup) for TTL automatic operation. Be sure the flash is set for zero flash compensation and take a test shot. In TTL mode the Speedlight will read the room: it will know where the point of focus is and what the aperture is, and it will deliver its choice of the correct amount of light. Check the test shot. Let's say there's not enough light on your subject—maybe you had to set a minus exposure compensation on the camera to handle the ambient light. To correct that, add a little exposure by setting the Speedlight's flash compensation to, for example, plus 1.3.
If there are additional Speedlight units in the setup, test shoot each group in the same way you tested the main light. (Group? See our note below.)
The key is to remember that once you've set the exposure comp on the camera for the ambient light, all compensation adjustments, if needed, are done on the flash units. If there's so little ambient light that it won't matter in the photo, you don't need to do the camera's ambient-light test; just set the camera for zero compensation.
You may find, like David, that once you've had some experience with flash photography you'll prefer going manual and adjusting your Speedlight's power output to control exposure. David's preference for the manual method comes from...well, we'll let him tell you.
"I want to be a smart photographer. I want to know what my lights are doing—how much power they're putting out. I want to know cause and effect, and with manual, I make a power setting and I see a result. Then, if needed, I make a change and I see that result."
Which builds knowledge, experience and the ability to first visualize a picture, then make it happen.
The Groups
Okay, it's a rather long note, but it's important.
David doesn't meter. He sets his cameras for manual mode and chooses his f/stop for the depth of field he wants for the photo. He set his shutter speed based on a number of factors—for example, If the photo will include some ambient light, he'll need a speed slow enough to capture it. If he's hand-holding, he'll need a faster shutter speed. Likewise, he'll set the ISO to accommodate the situation.
Then, with those settings made and effectively locked in, he controls the exposure by first setting his Speedlights for full manual mode and then adjusting their power output: full power, 1/2, 1/4, 1/8... whatever works. And he knows what will work because thanks to his years of experience he can pretty quickly size up a location and accurately set his Speedlights' power for the results he wants. If he's off a bit, a test shot will reveal it, and he'll make a power adjustment.
But David's workshop students don't have his experience, though they'll probably leave the workshop a lot closer to power adjustment skill than when they arrived. So If you're a beginner or intermediate flash shooter, David suggests you initially rely on the Creative Lighting System's automatic operation.
First, set your Nikon DSLR for aperture-priority exposure because selecting an f/stop is the crucial creative decision that will determine a lot about the look of your photograph. You might choose wide open (f/2.8, for example) for a bokeh effect or to blur a distracting background, or closed down (f/8 or f/16) for greater depth of field.
Then for any photo that's going to include a constant ambient-light source in addition to flash, take a Matrix-metered test shot of your subject in that light with the camera set for zero exposure compensation. If the test looks good, you're ready to turn on and set your Speedlight(s). If you need to adjust the ambient-light exposure, use the camera's exposure compensation function to increase or decrease the amount of ambient light captured in the image.
Once you're satisfied with the ambient light exposure, turn on your Speedlight(s). Set the main light (it'll be the only light for a single-flash setup) for TTL automatic operation. Be sure the flash is set for zero flash compensation and take a test shot. In TTL mode the Speedlight will read the room: it will know where the point of focus is and what the aperture is, and it will deliver its choice of the correct amount of light. Check the test shot. Let's say there's not enough light on your subject—maybe you had to set a minus exposure compensation on the camera to handle the ambient light. To correct that, add a little exposure by setting the Speedlight's flash compensation to, for example, plus 1.3.
If there are additional Speedlight units in the setup, test shoot each group in the same way you tested the main light. (Group? See our note below.)
The key is to remember that once you've set the exposure comp on the camera for the ambient light, all compensation adjustments, if needed, are done on the flash units. If there's so little ambient light that it won't matter in the photo, you don't need to do the camera's ambient-light test; just set the camera for zero compensation.
You may find, like David, that once you've had some experience with flash photography you'll prefer going manual and adjusting your Speedlight's power output to control exposure. David's preference for the manual method comes from...well, we'll let him tell you.
"I want to be a smart photographer. I want to know what my lights are doing—how much power they're putting out. I want to know cause and effect, and with manual, I make a power setting and I see a result. Then, if needed, I make a change and I see that result."
Which builds knowledge, experience and the ability to first visualize a picture, then make it happen.


