Getting the "Cool" Look
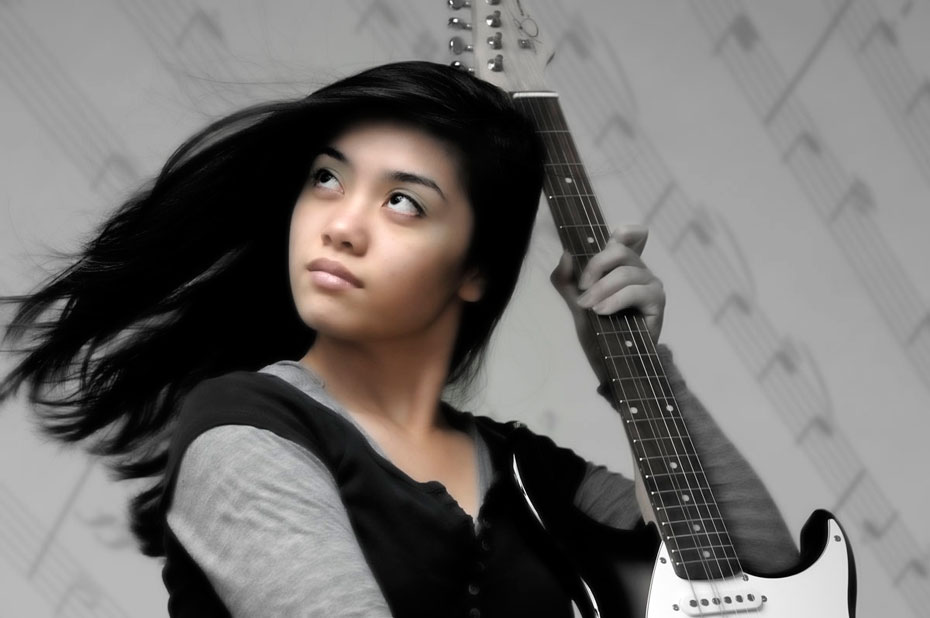
My daughter, Kiara, wanted some pictures of herself with her new guitar. She was looking for some “cool pictures that showed off the new guitar and didn’t look normal.” It was the perfect excuse to play with some new lighting and Capture NX 2 techniques.
One of the things I wanted to do in creating the final image was to have a background that spoke to the music Kiara likes to play on her guitar. I was able to create a PowerPoint slide from some sheet music I found online. I connected my laptop to my LCD projector and propped up the projector at the angle I wanted for the background.
Now that my background was set, I needed to set up my lights. I used a SB-900 Speedlight fired into an umbrella to light Kiara's face and an SB-600 aimed through a large diffusion panel to add the soft light for her body and guitar. (Like Joe McNally does on the Nikon Lighting DVD, I used a bed sheet for my diffusion panel.) I mounted the AF NIKKOR 85mm f/1.4 to my D90. The D90's built-in flash controlled the SB-900 and SB-600 via the wireless commander mode. The last step in the set-up was to ensure that I was creating a NEF file. I knew this would give me the most control possible once I got the image into my computer.

Once I got the NEF opened in Capture NX 2 (left image) I saw that there were a couple of things that could be improved:
-
The background had a green colorcast and was a bit flat looking
-
The overall image was a bit too flat
-
The side lighting caught the small bumps and imperfections on Kiara’s face
-
The image needed a more stylized look
My first step was to adjust the levels just a bit (right image). This bumped up the contrast of the overall image. However it made the issue with Kiara’s facial imperfections stand out a bit more.
To smooth out her face and add some stylization to the image, I opted for applying Noise Reduction. My NR settings were:
- Intensity - 80%
- Sharpness - #4
- Method - Best

I really liked the Noise Reduction effect except on the eyes and brows. The effect makes the eyes look too soft (left image). To fix this, I selected the – (minus) brush, set the opacity to 50% and adjusted the brush size to fit the eyes/brows. I then carefully subtracted the NR effect from the eyes and brows. I also enlarged the brush and subtracted a bit of the NR effect from Kiara's hair (right image).

Next I wanted to tackle the colorcast in the background (left image). I chose to convert the entire image to black and white. This made for a dramatic photo and fixed the colorcast at the same time. The BW conversion setting was:
-
Filter Hue – 60
-
Color Filter Strength – 40
-
Brightness – 0
-
Contrast – 0
Because of the 60 setting in the filter hue, the background went flatter (right image). To fix that I added a Control Point to the black coloring of one of the background notes. The contrast was adjusted to maximum. I then duplicated the CP and dragged it to the other side of the frame making sure it landed on a black stripe in the background. As a result, the contrast was increased in the background but NOT in Kiara’s face.


The final "not normal looking" image that Kiara wanted.


