Flash Points: The Control of Light
Three key elements in using photography lighting equipment
The Nikon Creative Lighting System is built around the incredible capabilities of Nikon Speedlights, and if you've seen flash wizard Joe McNally's advanced lighting videos (if not, check out the links at the bottom of the page), what you've undoubtedly realized is that Joe's flash techniques, methods and experiments are built on his ability to use flash to express his ideas and create a mood with light.
In one of the videos you hear Joe talk about warming up his subject. What he's referring to is the color temperature of the flash unit's light, and it's a key element in flash photography.
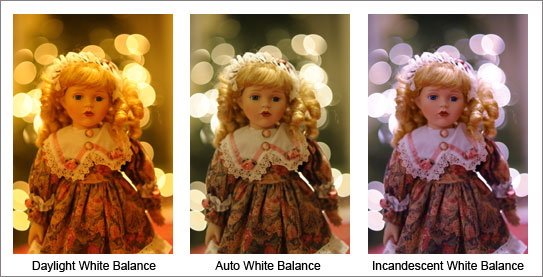
A light's color temperature can be thought of as its specific hue, which is measured and expressed in degrees Kelvin. Photographers tend to classify that hue as either warm (toward the orange and yellow range of light) or cool (toward the blue or green range). The lower the color temperature, the warmer the light; the higher the temperature, the cooler the light. As a guideline, consider that the closer you get to daylight, the closer you are to 5000 degrees Kelvin. And the greener a scene—say, a room lit by fluorescent light—the closer you are to 3000 degrees.
Using photography lighting equipment to vary balance in photos taken with different color flash points. -
But you needn't think about the actual degrees Kelvin of a light source. When Joe said he wanted to warm up his subject, he wasn't concerned with the specific temperature of the light; rather, he wanted his flash to cast a warm, slightly orange-hued light.
With a Nikon SB-900 Speedlight, it's incredibly easy to achieve that look. Supplied with each SB-900 is a set of color filters—Joe refers to them in the video as "smart filters;" they are also sometimes referred to as "smart gels."
Slip a filter into the supplied color filter holder, attach the holder to the flash head and you're ready to influence the color of the light.
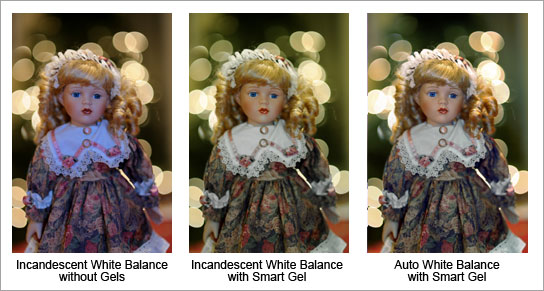
The incandescent (tungsten) smart filters warm up the scene or subject; fluorescent filters cool things down. Both are supplied in two densities. Equally important, the filters will balance the scene's ambient light with the light of the flash.
Lindsay Silverman using photographic lighting to show examples of images taken with different color flash points. -
What makes the filters smart? The answer to that is the key to practically automatic control of the scene's mood.
Each filter has embedded a silver identification code that communicates to the flash. When the camera is equipped with filter detection (as are the D3 series, D700, D300s, D90, D5000 and D3000 Nikon DSLRs) and is set to Auto White Balance, the filter will communicate with the camera as well, and the camera will know that a specific filter is in place. Every SB-900 comes from the factory balanced for daylight, but when a filter is placed over the flash head, the color temperature of the flash's light changes, and the camera has to know about that change. The smart filter takes care of that, automatically. The camera will adjust its white balance setting to correspond to the filter so that the camera's sensor will render a white object white.
Our eyes and our brain easily compensate for different types of light, so a white object will appear white no matter if we view it outdoors in sunlight or shade, or indoors under fluorescent or incandescent bulbs. A digital camera needs some help to handle this white-is-white task, and white balance is that help.
There's one situation in which you'll need to manually set the camera's white balance to correspond to the color temperature of the flash, and that's when you're using one or more SB-900s as wireless remote flash units. For scenes lit by incandescent lighting—household lights—set the camera's white balance to incandescent; for a fluorescent-lit scene, choose the corresponding setting.
What's really cool—and what puts you in total control of the mood and the message—is that the Nikon wireless remote system allows you to selectively and precisely place your flash units so they apply their color filter effects exactly where you want them. In the video, you'll notice that Joe uses the tungsten filter not to warm up the entire scene, but just his subject.
Another way you can control light in a scene is by deciding how you'd like to mix flash and ambient light. Joe uses this technique as well—it's what professional photographers call "dragging the shutter," and what they're doing is essentially illuminating their main subject with flash while the scene's ambient light takes care of the background. Simply select a shutter speed slower than the flash's top synchronization speed; the flash will fire, illuminating the subject, then the shutter will stay open to allow additional ambient light to reach the camera's sensor.
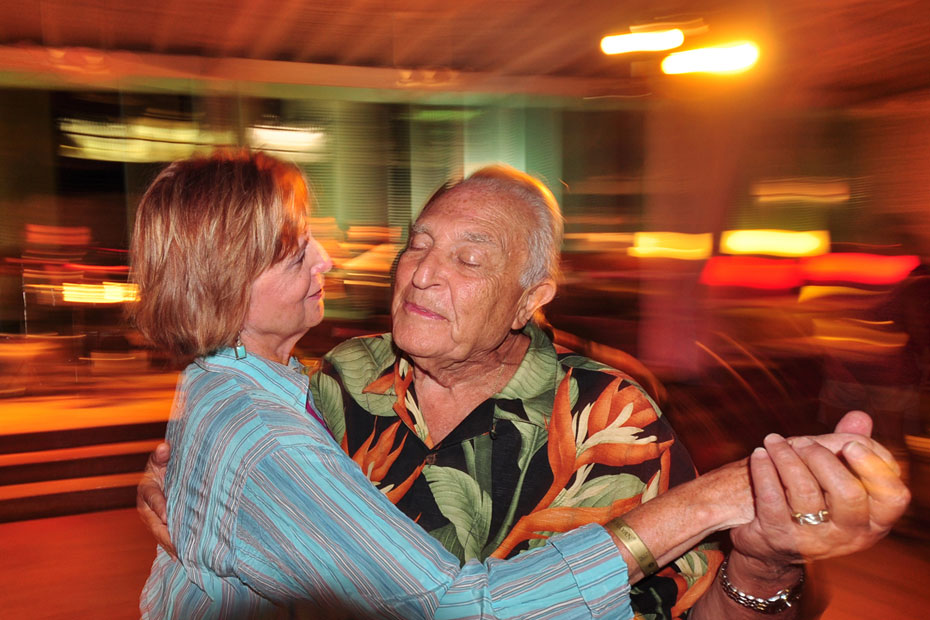
Dragging the shutter is a technique that offers a lot of creativity when a moving subject is involved. The key element is time: when will the flash fire—at the start or the end of the exposure?
Here's how it works:
In Nikon DSLRs there are two shutter curtains that come into play when an exposure is made. When you use flash, the flash fires just after the camera's first shutter curtain, the front curtain, completely opens, so the entire image area receives the light. After the flash fires, the camera's second curtain, the rear curtain, closes, covering the image area and ending the exposure.
When you set your Nikon DSLR for Auto flash, the camera will select its top flash sync speed (from 1/200 to 1/250 second, depending on the camera). But there are other options—and, of course, creative reasons for choosing them.
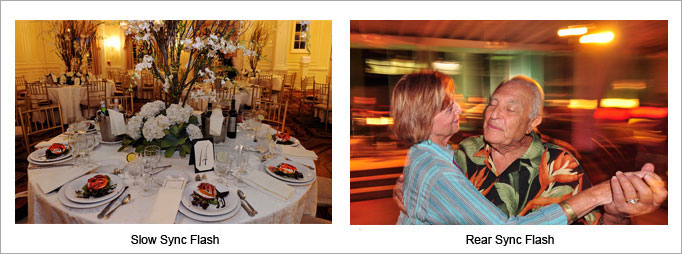
Set Slow Sync in aperture priority or program mode and the flash fires at the start of the exposure; then the shutter remains open for the duration of the exposure, allowing ambient light to pick up and record the scene's details. This is a great technique for interiors or environmental portraits (and other situations in which your subject is not moving) because the range of exposure times allows for perfectly balanced exposures. With a moving subject, the effect is quite different.
Let's say you're photographing a train set moving on a circular track. The flash will freeze the train, but the slow shutter will capture not only ambient light, but a bit of the train's blurred movement. Problem is, your image will show a stopped train with a blur of movement in front of it—a very unnatural look.
Better to shoot this scene using Rear Sync, in which the flash fires just before the rear curtain closes so the scene's ambient light is captured before the flash fires. The result: motion streaks behind your moving train.
Basically, Slow Sync is suggested for stationary or very slow moving subjects, Rear Sync for bodies in motion.
There are a lot of possibilities, that's for sure, but they're all pretty much automatic once you decide on the look you want for your photo. With Nikon Speedlights, the control of light is very much in your hands.
To learn more about the Nikon Creative Lighting System, check out these video tutorials by Flash Whiz, Joe McNally:

