How to Photograph a Lunar Eclipse
Lunar Eclipse Photos
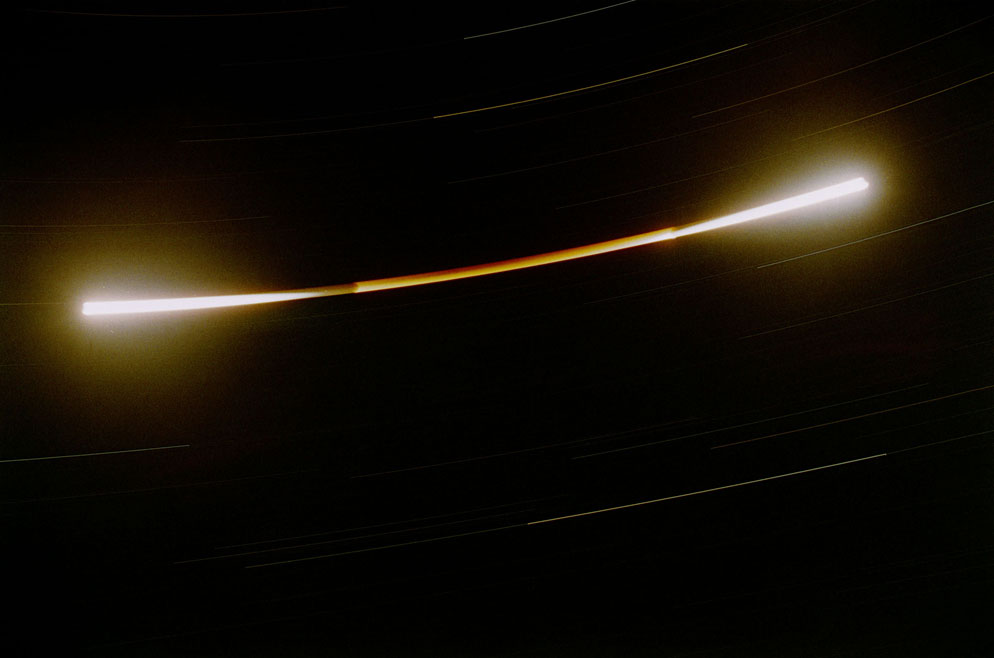
Star trail during the total lunar eclipse, Jan. 21, 2000. Nikon 8008 SLR, 50mm NIKKOR, f/16 opened to f/5.6 during totality, for a total exposure time of 2 hrs. and 30 min. on Kodak Royal Gold 400 film. The narrow lines that parallel the Moon's path are images of bright stars.
Updated 10/2023
A lunar eclipse occurs whenever the moon passes through the Earth’s dark shadow, which can only happen during a full moon. There are two or more lunar eclipses a year.
3 Types of Lunar Eclipses
Penumbral Lunar Eclipse. This occurs when the moon passes through the Earth’s penumbral shadow. These eclipses are subtle and hard to observe.
Partial Lunar Eclipse. This occurs when a portion of the moon passes through the Earth’s umbral shadow. These eclipses are easy to see with the unaided eye.
Total Lunar Eclipse. This occurs when the entire moon passes through the Earth’s umbral shadow. During the total phase (totality), the moon turns a vibrant red color. These are easy to see as well, with the unaided eye.
A lunar eclipse begins as a small notch slowly appears along one edge of the moon. During the next hour, the moon gradually dips deeper into Earth's dark umbral shadow. If the eclipse is a total one, the last remaining minutes of the partial phases can be quite dramatic. The crescent of the moon grows thinner as darkness propagates through a night sky now deprived of moonlight. If you're away from city lights, the Milky Way becomes bright and beautiful as the total phase begins.
No matter what kind of camera you own, there are a variety of techniques that you can use to photograph a lunar eclipse: wide-angle, telephoto, multiple exposure and star trail. While you can also use film cameras to photograph eclipses, this article specifically discusses digital camera use.
Lunar Eclipse Geometry
Wide-Angle
The wide-angle technique offers the simplest way to photograph a lunar eclipse. You can use any camera that is capable of long exposures, of five seconds or more. Because you’re going to be using long exposures, it is ideal to place the camera on a sturdy tripod. If your camera can utilize a cable release, using one is the best way to ensure that you won’t cause vibrations when you trip the shutter. If you don’t have access to a cable release, use the camera’s self-timer to trip the shutter to begin the exposure.
For COOLPIX digital cameras, set it to the widest focal length. For photographers using a Nikon DX format Mirrorless camera or DSLR, use a focal length range of 18-35mm. For photographers using a Nikon FX format Mirrorless camera or DSLR, you can use a focal length range of 28-35mm. For photographers using the Nikon 1 system cameras, use a focal length range of 10-30mm. Shooting a lunar eclipse with a wide-angle view lets you incorporate an interesting foreground into your image.
Camera Settings
As a starting exposure, set the camera to ISO 400, and open the lens to the widest aperture. Try a variety of exposures adjusting the shutter speed in 5-second increments. The slowest shutter speed that you should use is 40-seconds. Any longer than that and you’re going to begin to see star trails or streaks, caused by the earth’s rotation.
Star Trails
When you photograph the night sky using very long exposures of several minutes or more, you will end up with an effect known as Star Trails. Because of the Earth’s rotation, you are capturing a trail of the light from the stars (or moon in this case). Photographing a lunar eclipse this way will allow the moon to slowly drift across the frame. To photograph Star Trails, you will definitely need to use a cable release.
Camera Settings
Starting Exposures: begin by setting the ISO to 400, using an f/stop of f/8 or f/11 and set the shutter speed to Bulb. As the eclipse begins, place the moon’s image in one corner of the camera’s viewfinder. Make sure that you compose the image so that the moon will move across the camera’s field of view during the exposure. Turn Autofocus OFF and focus manually on infinity. Also, turn ON the camera’s Long Exposure Noise Reduction feature. Make sure you have a fully charged or fresh battery for the camera and an empty memory card. When you’re ready to make the exposure, lock the shutter open with the cable release and enjoy the eclipse.
You can figure out the approximate orientation by practicing one or two nights before the eclipse. The moon rises about 50 minutes later each night, so if the eclipse is set to occur at 10pm on a specific day, run the test the evening before at 9:10pm.
The moon appears to move across the sky at a rate of 15 degrees per hour. It should take the moon about three hours to traverse the field of view of a 35mm lens on a Nikon DX format Mirrorless or DSLR camera or a 50mm lens on an FX format Mirrorless or DSLR camera.
If the eclipse occurs in the early evening, the moon will be rising and its motion will bring it up and to the right as you face the moon. If the eclipse occurs during the middle of the night, the moon’s motion will be from left to right. If the eclipse occurs during the early morning hours, the moon will be setting, and its motion will take it down and to the right. These directions are for the Northern Hemisphere. If you are in the Southern Hemisphere, the motions in the left and right directions will be opposite.
When photographing a lunar eclipse using the wide-angle technique, you’re capturing one instant of the eclipse. When using the Star Trails technique, you’re capturing several hours of the eclipse... The Multiple Exposure technique combines the best of both.
Multiple Exposures
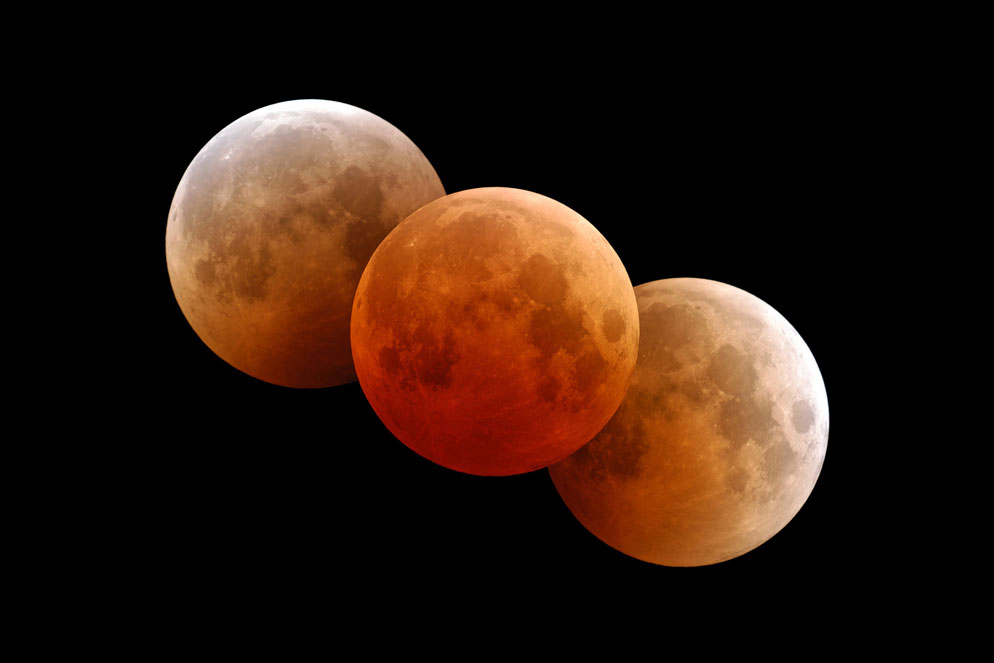
When photographing a lunar eclipse using the wide-angle technique, you’re capturing one instant of the eclipse. When using the Star Trails technique, you’re capturing several hours of the eclipse in one frame. The Multiple Exposure technique combines the best of both, by capturing a sequence of individual images that show the eclipse throughout its different stages.
Using a digital camera, you will be making a series of exposures, which will each be saved as individual files in the camera. In post-production, using software such as Adobe Photoshop, you can combine or “stack” the image files into one image that shows the series of small moon images each illustrating a different phase of the eclipse.
Camera Settings
Starting Exposure: to make multiple exposures during a lunar eclipse, camera set up and orientation is identical to the Star Trail method. But instead of taking one long exposure, you’re going to be taking a series of short exposures during the various stages of the eclipse. It is essential that the camera be on a sturdy tripod and not move throughout the eclipse.
Make the first exposure as the partial eclipse begins and then shoot additional exposures every 5 to 10 minutes. Be consistent and use the same time interval between shots so your final image will have the moon evenly spaced as the eclipse progresses.
Since the moon’s brightness varies during an eclipse, you will need to change the exposure throughout. Click here for Mr. Eclipse’s Lunar Eclipse Exposure Guide, which will help you determine the correct exposures for each phase of the eclipse, based on the ISO and f/stop you have selected.
For example, let's say you're using ISO 400 at f/8. The guide recommends a shutter speed of 1/1000 second as the partial eclipse begins. The shutter speeds for eclipse magnitudes (brightness) 0.3, 0.6, 0.8 and 0.9 would then be 1/500, 1/250, 1/125 and 1/60 second, respectively. Whatever exposures you use, it’s best to bracket one full f/stop around the recommended value. This is easy to do if you set the camera for bracketing before the eclipse begins.
Telephoto
To capture large images of the moon during a lunar eclipse, you will need to use a long telephoto lens or a telescope. You can also use a COOLPIX P&S digital camera with a superzoom. With a Mirrorless or DSLR camera, you can also combine a super telephoto lens with a Teleconverter to increase the focal length. You can also increase the relative size of the moon's image in an FX format camera by selecting DX Crop Mode.
There are many telescopes that will allow you to connect a camera, using an adapter. Using a telescope that has an equatorial mount and electric clock drive that counteracts the Earth’s rotation allows you to automatically track the sun, moon and stars for long exposure Astrophotography.
Camera Settings
Starting Exposure: the Lunar Eclipse Exposure Guide is a good starting point for photographing the moon during a lunar eclipse using a telephoto or super telephoto lens or telescope. Bracket your exposures by under- and over-exposing by one or two f/stops to ensure that you get a perfect exposure. To capture a good sequence of photos, you’ll probably want to take the bracketed series of exposures every 10 minutes.
During a total eclipse, the moon’s color and brightness can vary enormously, taking on hues ranging from bright orange, to deep red, dark brown or grey. The color is due to the indirect sunlight that is refracted through and filtered by the Earth’s atmosphere before reaching the moon. You can also use your camera’s Spot Meter to take an actual meter reading of the moon and bracket your exposures from that point.
Lunar Eclipse Time Lapse
Lunar Total Eclipse - The moon was photographed every 5 min. during the total lunar eclipse of Jan. 20-21, 2000.


